
Education today isn’t just about submitting papers anymore. Students now create digital portfolios with PDFs, images, videos, design files, and even 3D CAD models to show what they can do.
If you’re building a learning platform, digital classroom, or portfolio site, you’ll need a file upload system that can handle all these file formats easily.
The tricky part is that not all files are the same. One student might upload a PDF report, another a PNG image, and someone else a CAD file. Your system has to accept all of them without any issues.
That’s why a good file upload website is so useful. It helps users upload files quickly and keeps everything running smoothly.
In this guide, you’ll learn how to create a file upload website that accepts different file types, checks them automatically, and gives instant feedback, all without using complex code.
Tip: If you’re new to handling file uploads in HTML, you can check out MDN Web Docs’ guide on using file inputs to understand how browsers process file uploads.
Key Takeaways
- Support multiple file types: Educational platforms should allow students to upload different types of files.
- Add client-side validation: It gives instant feedback when a file is uploaded, which improves user experience.
- Set file size and format limits: This helps protect your server and ensures uploads stay clean and manageable.
- Use cloud storage: It makes file management easier and keeps your system lightweight and scalable.
- Show upload progress: Progress bars or status messages help students see that their files are uploading correctly, especially for large files.
Before we start coding, it’s important to understand the key parts of a file upload website, especially for student portfolio platforms that have to deal with many file types.
What You’ll Need
Here’s what you’ll need to get started:
- Frontend (HTML, CSS, JavaScript): The part of your website where students select and upload their files.
- Validation Logic: Rules that check file types, sizes, and formats before uploading.
- Storage Solution: A place to store uploaded files, either on your own server or in the cloud.
- Feedback System: Visual indicators to show upload progress, errors, or success messages.
For a student portfolio platform, you’ll often need to support formats like:
- Documents: PDF, DOCX, TXT
- Images: JPG, PNG, GIF
- Design Files: AI, PSD, SKETCH
- CAD Files: DWG, STL, OBJ
- Videos: MP4, MOV, AVI
Now, instead of building all of this from scratch, we can use tools like Filestack to simplify the process. It handles file uploads, validation, and storage automatically for you, so it’s easy and fast to handle different types of files.
So grab your coffee, and let’s start building this together!

Building Your File Upload Website
Now that you know what’s needed, it’s time to put everything together. We’ll go step by step to build a working file upload website that’s simple, clean, and easy to use.
Step 1: Create the Basic HTML Structure
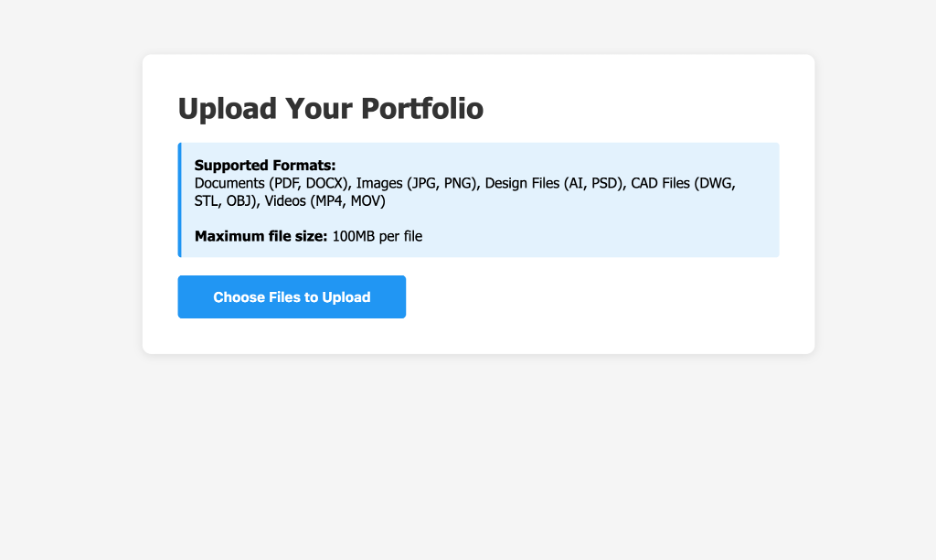
First, let’s make a clean and simple upload page. Create a new file called index.html and add the following code:
| <!DOCTYPE html> <html lang=”en”> <head> <meta charset=”UTF-8″ /> <meta name=”viewport” content=”width=device-width, initial-scale=1.0″ /> <link rel=”stylesheet” href=”style.css” /> <title>File Upload Website</title> </head> <body> <div class=”container”> <h1>Upload Your Portfolio</h1> <div class=”info-box”> <strong>Supported Formats:</strong><br /> Documents (PDF, DOCX), Images (JPG, PNG), Design Files (AI, PSD), CAD Files (DWG, STL, OBJ), Videos (MP4, MOV) <br /><br /> <strong>Maximum file size:</strong> 100MB per file </div> <button class=”upload-btn” id=”uploadBtn”>Choose Files to Upload</button> <div class=”uploaded-files” id=”uploadedFiles” style=”display: none”> <!– Include Filestack JavaScript SDK –> |
Now let’s style this upload page with CSS.
Here’s what it will look like:
Step 2: Add Filestack Integration
Now that your HTML page is ready, let’s add functionality to it.
Step 2.1: Create a JavaScript File
In the same folder as your index.html, create a new file called script.js. We’ll write all our upload logic in this file.
Step 2.2: Get Your Filestack API Key
To connect your website with Filestack, you’ll need an API key. It’s free and takes less than a minute to get:
- Go to Filestack.com.
- Create a free account or log in.
- Copy your API key from the dashboard. We’ll use it in the next step.
Step 2.3: Initialise Filestack
Open your script.js file and add this code. Replace ‘YOUR_API_KEY’ with the one you just copied.
This connects your website to Filestack.
| // Initialise Filestack with your API key const client = filestack.init(‘YOUR_API_KEY’);// Store uploaded files in an array let uploadedFiles = []; |
Step 2.4: Set Upload Rules
Now, let’s tell Filestack what types of files you’ll allow, how large they can be, and what to do when they upload successfully or fail.
| // Configure what file types and sizes to accept const pickerOptions = { accept: [ ‘.pdf’, ‘.doc’, ‘.docx’, ‘.txt’, // Documents ‘.jpg’, ‘.jpeg’, ‘.png’, ‘.gif’, // Images ‘.ai’, ‘.psd’, ‘.sketch’, ‘.fig’, // Design files ‘.dwg’, ‘.dxf’, ‘.stl’, ‘.obj’, // CAD files ‘.mp4’, ‘.mov’, ‘.avi’, ‘.mkv’ // Videos ], maxSize: 100 * 1024 * 1024, // 100MB maxFiles: 20, storeTo: { location: ‘s3’ }, // Store files in the cloud // What happens when the upload completes onUploadDone: (result) => handleUploadSuccess(result), // Show upload progress in the console // Handle upload errors |
Step 2.5: Open the File Picker
Now let’s make the upload button work.
When users click it, Filestack’s file picker will open.
| // Open Filestack picker when button is clicked document.getElementById(‘uploadBtn’).addEventListener(‘click’, () => { client.picker(pickerOptions).open(); }); |

Step 2.6: Handle Successful Uploads
Once files are uploaded, we’ll store their details and show them on the page.
| // Handle successful uploads function handleUploadSuccess(result) { console.log(‘Upload successful!’, result); // Add uploaded files to our list result.filesUploaded.forEach(file => { uploadedFiles.push({ name: file.filename, url: file.url, size: file.size, type: file.mimetype }); }); displayUploadedFiles(); |
Step 2.7: Display Uploaded Files
Now let’s show the uploaded files nicely on the page.
| // Display uploaded files function displayUploadedFiles() { const filesContainer = document.getElementById(‘uploadedFiles’); const filesList = document.getElementById(‘filesList’); if (uploadedFiles.length === 0) { filesContainer.style.display = ‘none’; return; } filesContainer.style.display = ‘block’; uploadedFiles.forEach(file => { const icon = getFileIcon(file.name); fileItem.innerHTML = ` |
Step 2.8: Add Some Helpers
Let’s add small helper functions for file icons and file size formatting.
| // Show icons based on file type function getFileIcon(filename) { const ext = filename.split(‘.’).pop().toLowerCase(); const icons = { pdf: ‘📄’, doc: ‘📝’, docx: ‘📝’, txt: ‘📝’, jpg: ‘🖼️’, jpeg: ‘🖼️’, png: ‘🖼️’, gif: ‘🖼️’, ai: ‘🎨’, psd: ‘🎨’, sketch: ‘🎨’, dwg: ‘📐’, stl: ‘📐’, obj: ‘📐’, mp4: ‘🎥’, mov: ‘🎥’, avi: ‘🎥’ }; return icons[ext] || ‘📎’; }// Format file size (e.g. 1.2 MB) function formatFileSize(bytes) { if (bytes === 0) return ‘0 Bytes’; const k = 1024; const sizes = [‘Bytes’, ‘KB’, ‘MB’, ‘GB’]; const i = Math.floor(Math.log(bytes) / Math.log(k)); return Math.round((bytes / Math.pow(k, i)) * 100) / 100 + ‘ ‘ + sizes[i]; } |

And that’s it! You now have a fully functional file upload system.

With just a few lines of code, Filestack takes care of everything for you, from showing upload progress to handling file storage and completion automatically.
Best Practices
Here are a few simple tips to make your file upload website smoother, safer, and easier to use:
1. Always Validate on Both Sides
Don’t rely only on browser-side validation. As OWASP explains, you should always double-check file types and sizes on your server too. This keeps your site secure and prevents harmful uploads.
2. Provide Clear Feedback
If something goes wrong, tell users exactly what happened. Instead of showing “Upload failed,” say something like “Your file is too large. Please upload a file under 100MB.” Because clear messages save time and reduce confusion.
3. Use Meaningful File Names
Encourage students to name their files properly. For example, “JohnDoe_FinalProject.pdf” is much better than “document1.pdf.” It helps teachers find and organise submissions easily.
4. Show Upload Progress
Large files take time to upload. Show a progress bar so students know their submission is processing and not stuck.
5. Set Reasonable Limits
Too much freedom can cause problems. A 100MB limit is usually enough for most projects; it keeps things flexible but also protects your server from overload.
Data Privacy and Compliance
When students upload their work, it’s not just about getting the files; it’s also about keeping their information safe.
If you’re building an educational website, it’s important to follow privacy rules like FERPA (for schools in the U.S.) and GDPR (for users in the EU). These laws make sure that student data is handled securely and responsibly.
Here are a few simple tips to stay safe and compliant:
- Only collect what you need: Don’t ask for or store extra personal details in file names or uploads.
- Keep files secure: Use private links or tokens instead of sharing public URLs.
- Use encryption: Make sure files are protected while uploading and while stored in the cloud.
- Be open with users: Let students and teachers know how and where their files are stored, especially if you’re using a third-party service like Filestack.
For more details, you can check out FERPA’s official guide and the GDPR compliance overview.
Common Pitfalls to Avoid
Even simple upload systems can run into problems if you miss a few small details. Here are some common mistakes to watch out for:
1. Accepting Unlimited File Sizes
If you don’t set limits, one huge 5GB video could crash your server. Always add a maximum file size rule.
2. Ignoring File Extensions
Just checking a file’s MIME type isn’t enough. Someone could rename a harmful file as “project.pdf.” Make sure you check both the file’s extension and its actual content.
3. No Error Handling
Uploads can fail for many reasons: slow internet, timeouts, or power cuts. Add retry logic and friendly error messages so students don’t lose their progress.
4. Freezing the Page During Uploads
Long uploads shouldn’t freeze the page. Use asynchronous uploads and show progress updates while the file is being sent.
- Storing Files Without Organisation
Don’t dump all files into one folder. Keep things organised by student, date, or assignment. For example: /uploads/student123/2025-11-05/final-project.pdf.
Conclusion
Building a file upload website for student portfolios doesn’t have to be overwhelming.
If you focus on the basics, like checking files properly, giving instant feedback, and using modern cloud storage, you can easily create a platform that handles everything from simple PDFs to large CAD files.
Whether you’re building a simple classroom upload page or a full learning management system, these steps will help you build something reliable and easy to use.
Start simple, try things out, and pay attention to what students say. Their feedback will help you improve your site.
Use the example above and tweak it for your project, and remember, make uploading easy so students can focus on learning instead of struggling with the website.
About the Author
Shefali Jangid is a web developer, technical writer, and content creator with a love for building intuitive tools and resources for developers.
She writes about web development, shares practical coding tips on her blog shefali.dev, and creates projects that make developers’ lives easier.
